Deck building blunders are as common as sand on a beach. A simple internet search for deck fails will uncover myriad articles and videos highlighting deck collapses – both funny and not –that can be directly connected to construction errors. Despite what many home improvement television shows may lead viewers to believe, building a deck is a major undertaking. There are many design and safety factors to consider and a number of pitfalls to avoid during the process. This article addresses some of the most common deck building mistakes and how to successfully navigate them.
Mistake 1: Attaching the Ledger Board to the House Incorrectly
It’s very common for half the weight of a deck to be transferred to a ledger board that’s connected to the side of a house. The ledger board becomes a beam and thousands of pounds of weight might be held up in the air by this single board. This weight must be transferred to the structural components of the house, not the superficial siding or outer skin covering of the house. What’s more, the ledger board must be attached so it never pulls away from the house causing a catastrophic failure and collapse.
Here are just a few of the most common deck-ledger attachment mistakes:
- Nailing the ledger board to the house
- Using lag bolts to anchor the ledger board
- Using fasteners that don’t offer decades of corrosion resistance
Nails are the poorest choice of fastener because they’re not strong enough to hold all the weight. What’s more, they usually will pull away from the house with minimal effort. Decks can fall away from a house if a group of people start dancing on a poorly built deck. This happens without warning and people can be injured or killed.
Lag bolts are often thought of as a great ledger fastener. They are, in fact, a poor choice. Since you can’t see what’s exactly behind the siding or brick of your home, how do you know if they’re biting into solid wood behind the exterior skin of the house? What’s more, if the installer is overly aggressive and overtightens the lag bolt, they’ll strip the wood and greatly reduce the holding power of the lag bolt.
Modern treated lumber has a high copper content. This copper is what helps stop wood rot. Copper and iron are dissimilar metals. You have iron or steel in all the fasteners and structural connectors in your deck. When copper and iron are mixed with water, it results in a galvanic chemical reaction resulting in the corrosion and destruction of the steel or iron.
This means all fasteners, especially those used for the ledger board, must be stainless steel or have a very thick hot-dipped double galvanized coating to resist this corrosive chemical brew. Any deck built near an ocean or sea where salt spray or salt mist might get on the deck must be built using stainless-steel fasteners. The salt in ocean water also accelerates corrosion.
Solution
The preferred method to attach a ledger board to a house is to use through bolts. These fasteners penetrate completely through the ledger board, the outer skin of the house and then through the horizontal joist or band board inside the house. A washer and nut is put on the machine threads on the end of the through bolt. The only way the ledger board can detach and fall to the ground is if it pulls the inside structural joist or band board with it.
The best way to attach a ledger board is to use special hold-down anchors that attach to the sides of the deck joists. These anchors connect with a matching anchor bolted to the sides of the joists inside the home. A galvanized threaded rod passes through the ledger board and connects the two anchors together. Structural engineers highly recommend this method to ensure the ledger board never falls or detaches from the house.
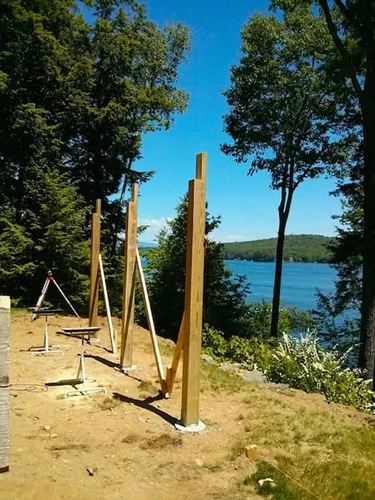
Mistake 2: Incorrectly Attaching the Beam to the Support Posts
You may have a deck without posts where the joists just rest on a concrete grade beam. These are by far the safest decks. However, most decks are raised four, or more, feet off the ground. At the far end of the deck away from the house you’ll typically discover a beam that the deck joists rest upon. This beam, in turn, needs to be supported by posts that extend down to the ground. Think of the posts as being table or chair legs. If the beam is not connected to the posts correctly, the beam can rotate and fall off the posts. This error can result in collapse.
Solution
There are two ways to attach the beam to the posts so it won’t roll off. Most beams are just two 2x10s or 2x12s. The width of the beam ends up being about 3 and 1/4 inches. You can use 6x6 posts that allow you to cut an L-shaped notch at the top end of the posts.
The beam rests on this ledge for solid support and the 2 inches of left-over post continues up to the top of the beam. You then attach the beam to this long tongue of wood using through bolts. It’s a time-tested connection method.
The second method is to purchase structural metal framing connectors that are designed and tested to make approved and solid connections between the posts and the beam. There are quite a few designs and types available. Be sure to verify the connector you intend to use is rated for the size of the lumber you’re using. Check to make sure the metal connector has enough corrosion resistance as it will be getting wet.
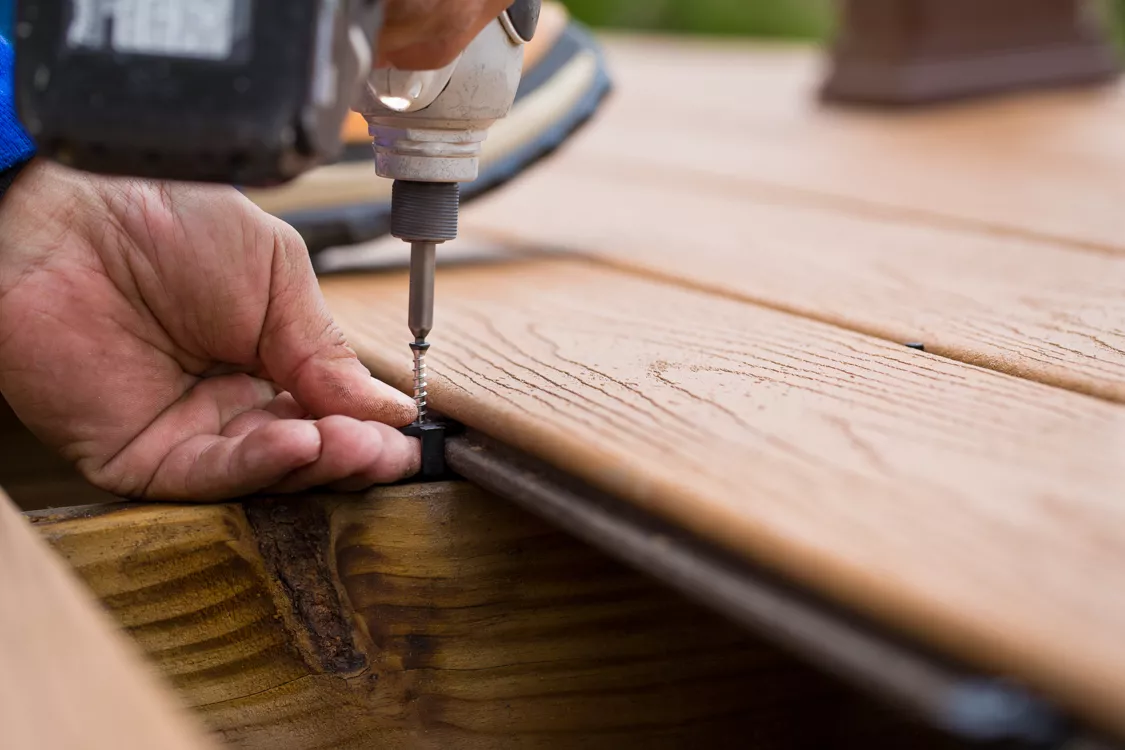
Mistake 3: Using the Wrong Deck Fasteners
It’s easy to make the mistake of using the wrong deck fasteners. You might have seen installers using a nail gun to fire nails through wood decking as fast as a kitten laps milk from a bowl. The nail gun is not a bad idea, but it’s all about the quality of the corrosion resistance on the actual nail. No matter what way you choose to secure your decking, be sure to use corrosive-resistant deck fasteners. Many have inferior thin electroplated galvanized coatings.
Solution
You first have to decide if nails are the best way to go. Nails have a tendency, over time, to start to work their way out of the joists. Screws will almost always perform better than nails and screws rarely pull out.
Before you decide on which fastener to use, check with the manufacturer of the decking for their recommendation. It’s very possible a specific nail or screw-type is required. Keep in mind that using the wrong fastener might void the warranty of the decking material.
You also need to realize that most nails that go into nail guns have a superficial galvanized coating. These nails can rust in a short amount of time. Electroplated galvanized nails are subject to this rapid failure.
The best fasteners are stainless steel. The second best are ones that are double-dipped hot-dipped galvanized.
It’s also a great idea to cover the top of the joists with a special joist tape that minimizes the amount of water that can soak into the top of the floor joist through the fastener hole. This tape is easy to apply and will help preserve the joists and ensure the decking stays tight to the joists.
Mistake 4: Incorrectly Spacing Deck Joists
Deck joist spacing is more important than you might think. This is especially true when using composite decking. Composite decking spacing is mission critical as it ensures the decking boards will not sag over time.
Solution
Before you start to build the undercarriage of the deck, stop and read the installation instructions for the decking. If you intend to install the decking on a diagonal, you’ll probably be shocked to discover the joist spacing will need to be 12 inches on center. This is because the diagonal measurement across joists is greater than the distance when you measure perpendicular across the joists.
You should also pay close attention to the decking requirements when it comes to the bearing surface under the ends of each piece of decking. Some composite decks must have 1.5 inches of bearing surface at each end of the decking board. Normally you might only have ¾-inch of bearing when you butt two pieces of decking on top of a single joist.
Mistake 5: Blocking Access or Egress
Your deck is an outside room when you stop and think about it. Just as you need easy access into each room of your home, you need easy deck access. You should be able to get on and off the deck safely with nothing blocking your way.
Solution
Egress from a deck is just as important. Should you need to exit your home in an emergency and go out on your deck, you don’t need things blocking you from getting away from the house. This means a pathway on the deck should always be clear and steps leading from a deck should never be blocked. As with all things, just use some common sense.
Mistake 6: Improperly Installing Handrails (or Failing to Install Them At All!)
Deck handrails and guardrails are mandatory safety features. The building code has clear guidelines about when handrails must be installed and how strong they need to be. Ground-level decks normally don’t need handrails, but once a deck surface is higher than two or more feet above the ground, it’s a good idea to install handrails.
Additionally, from a design standpoint, railings are often overlooked during the design phase of a deck build, which is a mistake in and of itself. Since railing tends to be one of the most expensive and visual aspects of an outdoor space, it’s important to spend time considering your options and to consider them early in the process. In addition to being functional, railings are an architectural feature, like shutters, and should complement your home and reflect your personal style.
Solution
Installing deck handrails requires a great degree of skill. Do not use lag bolts. Keep in mind that handrails and handrail posts become levers when a person pushes or leans against the top of a handrail. If multiple people push against a handrail at the same time, the force can be extreme and lag bolts will pull out faster than a crowbar removes a common nail from lumber!
Through bolts are the approved fasteners to use to secure handrails and handrail posts to the deck undercarriage. Better yet, use special hold-down anchors that are bolted to the sides of the deck joists and then are through bolted to the post. These create extremely strong connections.
Nails should be avoided in any handrail installation. Over time nails have a tendency to lose their holding power. Portions of a handrail can detach from the posts with little or no warning if the nails corrode or lose their grip.
Pay close attention to the building code with respect to all the requirements about deck handrails. Keep in mind the building code is a set of minimum standards. You can always build better than the code. Think long-term. Think about a person leaning against the handrail twenty years from now you plan to build next weekend. Will the handrail be as strong then as it is the day you built it?
Mistake 7: Building Inadequate Deck Post Footers
A deck post footer, or footing, is the place where all the deck weight is distributed to the ground under the deck. Keep in mind that different soils have far different strengths. Some soils are so weak you can push a stick down into them with ease. Other soils are so hard and strong, they’re like rock!
Solution
If you don’t have experience with soils and soil strength, it’s a very good idea for you to talk with the local building inspector before you start digging for your deck footings. Ask the inspector the following questions:
- How deep should the hole be?
- What is the diameter or size of the hole?
- How thick should the footing be?
- Should I put reinforcing steel in the footing?
- Is it best to have the footing extend up and out of the soil and how high?
When installing a deck footer, realize the bottom of a deck footer needs to be below the local frost line. Frost heave is real and it can lift an entire deck up 4 or more inches! The diameter or size of the bottom of the footer is important. You want to distribute the concentrated loads of the deck posts across as wide a footprint on the soil as possible.
Most deck footers should be at least 8 inches thick and a poured concrete column on top of the footing should be no less than 6 inches in diameter. Eight or ten inches is far better.
Reinforcing steel is inexpensive and it adds tremendous strength to footers and pier columns. Always use it.
Never bury a treated lumber deck post in the soil. Stories abound on the Internet about buried treated lumber posts that have rotted out or been eaten by insects! Extend the deck footing up out of the soil about 6 inches so the wood post is away from all moist soil or standing water.
Mistake 8: Selecting the Wrong Decking Material
Early in your deck-planning process you must do an exhaustive decking material comparison. The way you frame your deck depends on the actual decking. Don’t assume that all decking is installed the same way.
Solution
Decking comes in two major categories:
- Natural wood
- Composite decking
Both materials have their pros and cons. Be honest with yourself when you’re doing the comparison between wood and composite. It may help to create an actual written list to help you decide.
Natural wood is almost always easier to cut and fasten. That said, some of the rainforest wood products are so hard you have to drill a hole for each fastener! All wood decking requires periodic cleaning and sealing. It’s best to use a certified organic oxygen bleach to clean wood decking. Never use chlorine bleach as it destroys the lignin that holds together the wood fibers. Chlorine bleach will also remove the natural color from wood.
Cleaning and sealing a wood deck is exhaustive work. You’ll be lucky to get three years out of the top sealer. Splinters are also an issue with natural wood. Keep that in mind if you or your loved ones have tender feet.
Composite decking requires very little maintenance. You may just have to scrub it lightly with regular liquid dish soap once a year to remove airborne dirt and a light algae film. You never have to seal a composite deck.
Building with composite decking is very similar to working with wood. The nice part is the boards are consistent and you don’t have to work around knots, warps or splits. The best composite decking materials have special fastener systems that ensure the decking is spaced correctly and looks superb for many years. These fasteners don’t install as quickly as nails driven by a nail gun but the results are worth the extra time and effort.
No matter which decking material you choose to install, don’t skip the step of installing protection tape on top of the wooden beams and joists of the substructure. These tapes prevent water from seeping into the boards around holes created by the fasteners. Water, over time, can create cracks in the wood and the fasteners can come loose.
Mistake 9: Not Installing Proper Flashing
Deck flashing is an important detail that many homeowners and rookie contractors overlook. All too often it’s installed improperly or not at all.
Deck flashings are materials meant to capture water and redirect it to the outer skin of the house. Flashing can be made from a variety of materials including solid copper, zinc-coated steel, and rubberized synthetic membranes.
Solution
It requires a great understanding of physics to properly install flashings. You’ll quickly discover that soldering is required to properly construct a joint where two pieces of flashing connect to one another. Copper is the easiest of all flashing materials to solder.
Never depend on caulk to seal a joint in flashing. Caulk is not a permanent flashing material. The sun’s ultraviolet (UV) rays will destroy most caulks in a short amount of time.
Be aware that most synthetic membranes shouldn’t be exposed to sunlight for an extended period of time. Read their installation instructions to ensure the material is UV stable.
You need to understand the importance of kick-out tabs on metal flashings. A kick-out bend on the edge of a flashing prevents capillary attraction of water. You want water drops to fall away from the flashing, not be sucked back under and up a flashing as happens with capillary attraction.
Mistake 10: Not Following Local Building Codes or Failing to Get Proper Permits
Deck permits are required by almost every city or town in the USA. In addition, some states require stamped construction drawings from engineers when applying for a permit. Unfortunately, in some cities or towns, the permit doesn’t mean the deck will be inspected. You should ask your building department about this before you even begin planning your deck.
You also need to ensure your deck plan meets local building codes and safety standards. Know your setbacks and easements, which are particularly important in neighborhoods with covenants and restrictions. Fines can be steep and delays costly. Building without a permit can also pose a problem when you try to sell your house and a prospective buyer or home inspector finds there is no permit on file with the local building office
Solution
Obtaining a permit and following local deck-building codes can help prevent accidents and headaches. You may discover early in the process that your deck violates a zoning code, for instance. Can you imagine investing all the money and work to build a new deck without a permit and then discovering that you have to tear it down or reduce it in size because you failed to get the proper permit from the start? It happens every year to well-intentioned DIYers. Don’t let it happen to you!
Additionally, if you are part of a Homeowner’s Association, you’ll need to be aware of those requirements as well. Associations can limit the type of materials you are able to use and require specific styles of railing and balusters. Do your homework. Ask for guidance. Check with neighbors who have already gone through the process.
When in Doubt, Get Professional Deck Building Help
Building a deck can be an overwhelming, but ultimately, rewarding endeavor. However, it’s important to understand what you’re getting into before digging that first post hole. Make sure you’ve prepared properly and are willing and able to deal with problems that will surely arise. Find a deck builder near you to help avoid these common deck building mistakes.