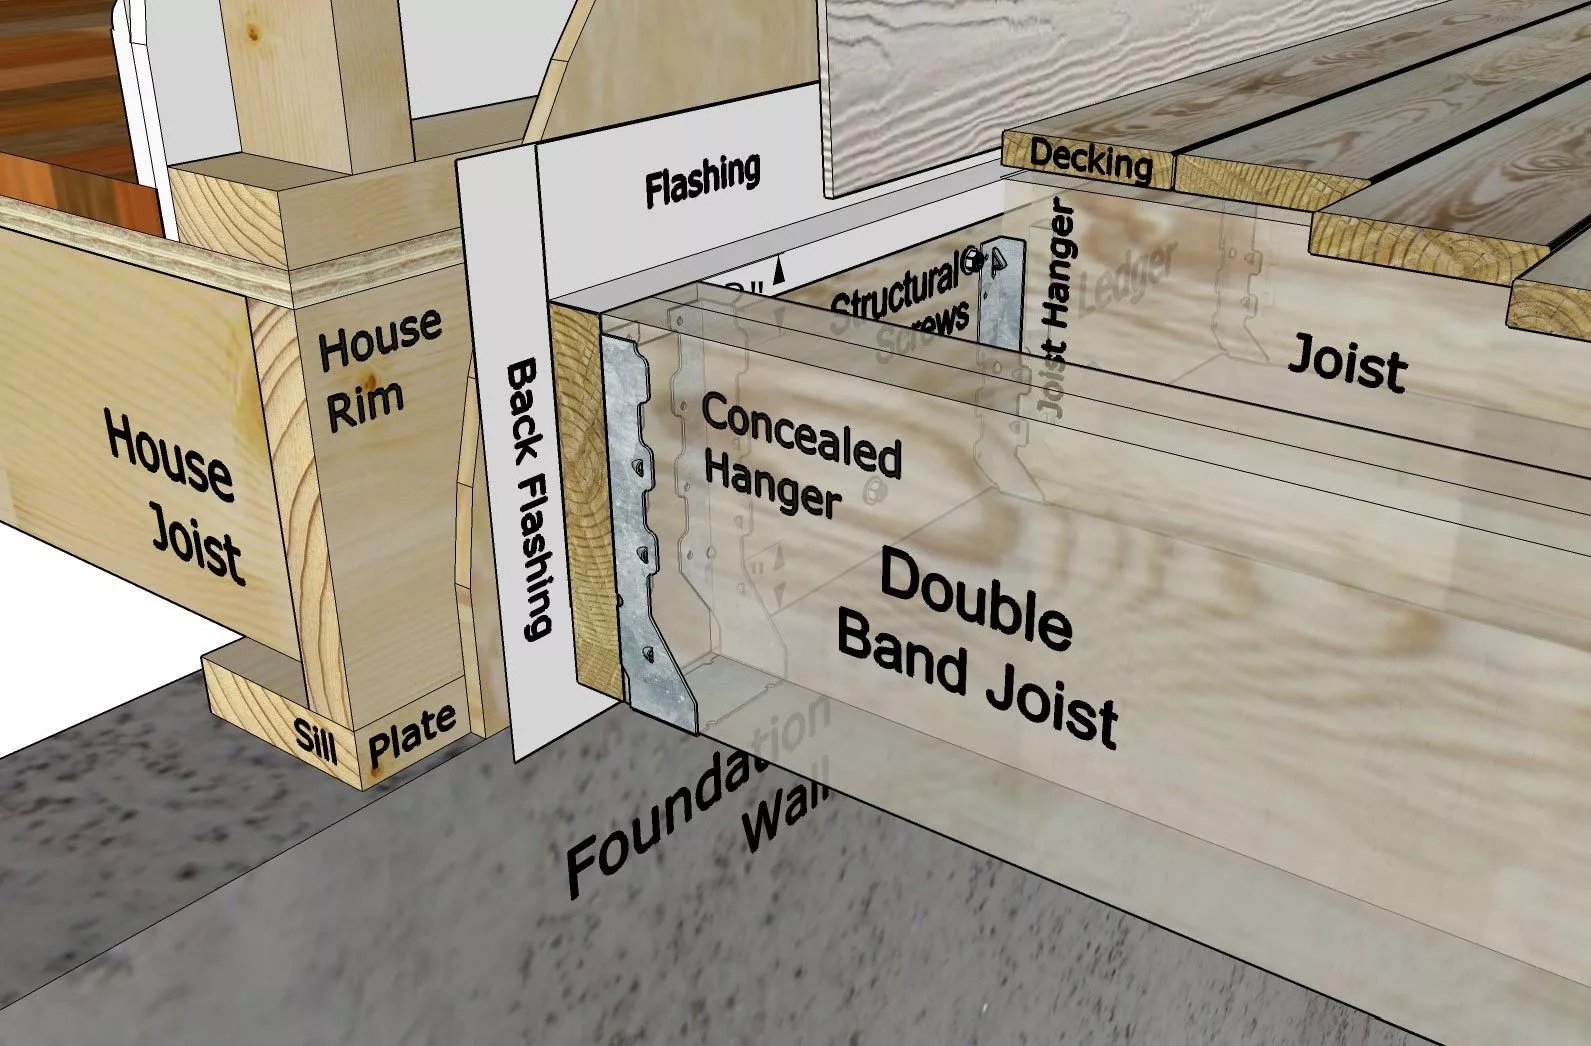
The ledger provides much of a deck’s strength; it supports the joists at one end, and it provides stiffness to the framing. (A free-standing deck, of course, does not have a ledger.) The ledger is made of the same material as the rest of the framing—usually pressure-treated lumber.
Some builders install the ledger first, before they lay out for the footings and dig the post holes. They then use the ledger as the basic point of reference for determining footings, posts and all the framing.
If your house was built since the mid 1990s, there is a chance that the floor system is constructed with a MWJ (Manufactured Wood Joist) floor system. In these cases, it is very important to consult with a building inspector, engineer or architect to understand how to correctly attach a ledger board to the house wall.
[tip] Lower the Deck to Keep Snow Out
In areas with heavy snowfalls, it may be desirable to have the finished deck 1 1/2 inches or so below the sill. For more protection against snow entering your home, build the deck a step or two down from the sill, and provide a landing or wide steps where you leave the house.
Do not attach a ledger board to brick or stone veneer exteriors. In these cases, you will want to build a free-standing deck frame.
1. Carefully determine the height for the ledger—which will also be the height for all the joist framing. The top of the ledger board should be lower than the desired top of the finished deck by one decking board’s thickness, plus the thickness of the flashing (usually 1/8 inch). The finished deck height is 1 inch below the bottom of the sill. The decking is 1-inch thick, so the top of the ledger is 1 1/8 inch below the bottom of the sill.
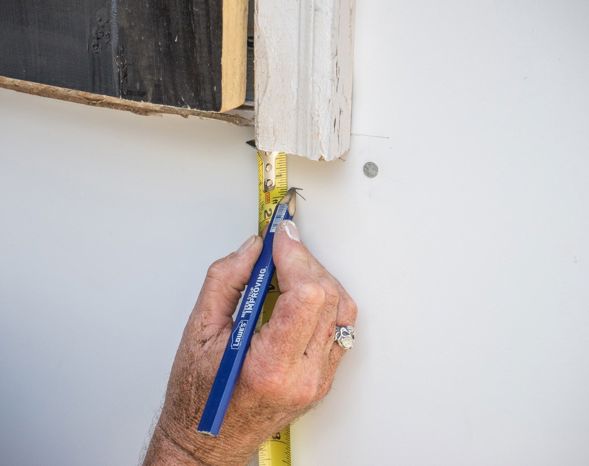
In the photo here, the door casing has been cut to the desired top of the deck, so the decking can just slip under the casing. In this case, measure down from the bottom of the casing by the thickness of the decking, plus the 1/8-inch thickness of the flashing. The ledger has been dropped another 1/8 inch (for a total of 1 1/4 inches), just to be safe. Learn how to remove siding or stucco before installing a ledger board.
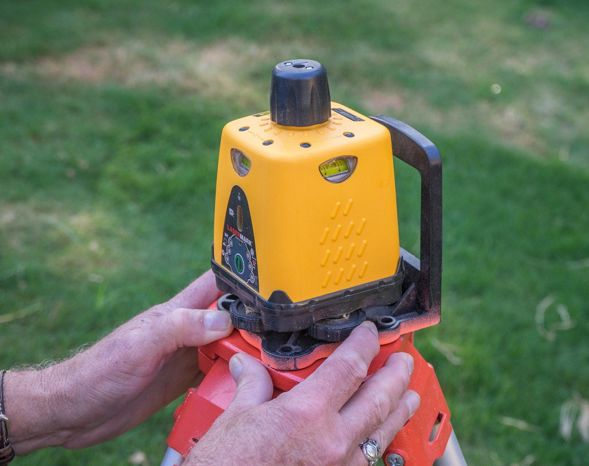
This is a laser level that attaches to a tripod. There are many different types of laser levels available at prices ranging from $200 to $1,000. There are other ways to level a deck that are more affordable.
2. Adjust a laser level so it is perfectly level. It is difficult to get the dot to shine at the exact height of the ledger, so have it shine a small distance below your mark from step 1. In this case, the dot is 7 3/4 inches below the ledger height. Now you can move the laser around to point at other places, and measure up the same distance (in this case, 7 3/4 inches) to find the desired top of the ledger.
3. Make pencil marks at various points on the wall, and snap a chalk line between them. To double-check for level, hold a 4- or 8-foot level against the chalk line.
Other Ways to Level
If you do not have a laser level, you can use a water level, or a long, very straight board with a level taped to its top.
4. Ledger boards should be very straight. Look down along their edges to find boards that do not have defects. Cut the boards to the desired lengths. Make sure the crown (the upward curvature of the growth rings) of the ledger board points up.
5. Because a ledger board is very heavy and hard to work with, you need to drive framing nails (16 penny) or screws every two feet to temporarily attach the ledger. (In our example, one of the ledger boards extends past the house.) Do not drive the structural lag screws at this time, because you do not want them to get in the way of the joists you will install later. DO NOT install the joists until the ledger is bolted in place.
6. After properly installing the flashing, install the siding above the ledger as needed. Make sure the bottom of the siding will be at the desired height in relation to the decking. In our case, we want the bottom of the siding to be 1/4 inch above the decking, which will be 1-inch thick. So we rip-cut a spacer board to 1 1/4-inches thick.
7. Slip the siding up under the siding board above. You may need to pry the upper board out a bit, and you may need to remove some nails. Use the 1-1/4" spacer board to position the siding at the correct height, and drive nails to fasten it.
Lay out the joists on the ledger as shown here. Then, come back to this article to finish attaching the ledger.
8. After the ledger has been laid out with the locations of the joists, drive the final structural fasteners. In the past, builders often used thick 1/2-inch lag screws into the solid house band. Nowadays, 1/4-inch structural lag screws are preferred. Because of the metal they are made of, they actually hold firmer and have greater shear resistance than the larger screws. And, there is no need to predrill pilot holes. The spacing of your structural screws depends on the type of house rim you are attaching to and the length of the joists. Never install a ledger board with nails. Nails are not designed for this purpose and may withdraw over time.
Important Note: Be sure to verify the structural fastener attachment spacing and installation with your local building department for your specific situation. Note that many newer houses are built using engineered floor truss systems that require special ledger board attachment techniques.