
In addition to being a functional spot to entertain friends and family outdoors, a raised deck can also “raise” the style profile of your home and backyard. Sometimes referred to as an elevated deck, a raised deck is a great option for entertaining outdoors. It acts as an extension of your indoor space, taking the excitement or relaxation right outside where you can enjoy the fresh air and scenic views.
Beyond a raised deck offering an attractive outdoor space and adding value to your home, there are other considerations for building a raised deck including: the terrain, location, type of lumber available, and of course, the cost and project completion estimate. An above-ground deck works especially well for those living in elevated homes that are closer to sea level or in a flood zone, as well as for homes that have a backyard with a steep incline.
Building your own elevated deck can be accomplished in a few weekends, depending on the size and shape of your deck, as well as your skill level with DIY projects. If you’re considering building your own raised deck, it’s best to do your research to formulate a plan to build your deck and get years of enjoyment from it. For more detailed information, we recommend consulting the installation guides provided by the manufacturer of your decking materials.

Building An Elevated Deck: Step-By-Step
Step 1: Design Your Raised Deck
Start gathering inspiration by looking at websites or Pinterest boards to see what may work for your personal aesthetic and backyard layout. You can review images online to choose a design and talk with specialists at a building supply store for input. You can even chat with neighbors who have built similar structures and understand some of the limitations of the particular terrain or geography within your neighborhood.
At some home supply stores, staff will even design an elevated deck for you if you buy your supplies from them. You can also look to several free apps and online programs to help you design your deck according to your exact specifications and ideas you have in mind.
Step 2: Determine Your Budget
Your budget will also play a role in the type of materials to choose, the size of your deck, and what types of add-ons you may want to consider. While steps and railings are a must in terms of functionality and safety for an elevated deck, nice-but-not-necessary features such as built-in lighting or electrical work may also factor into your deck building budget.
Budget factors to consider include how big you want your deck to be and the type of lumber you’ll use. The staff at your local home supply store can share recommendations to help you stay within your allotted budget. Similarly, some apps can help you better anticipate just how much you’ll need to set aside to build your deck.
Step 3: Apply for a Building Permit
Most cities, towns, and neighborhoods require building permits for building a deck above ground. They’ll want to know specifics like the size, height, and type of lumber to determine if it meets safety regulations. If you’re working with a contractor, you’ll want to be able to submit blueprints for the deck to have on file to make sure that your deck conforms to safety regulations, as well as local building codes. If you’re going the DIY route, several free apps can help you generate blueprints to take to your building office when applying for permits.
Step 4: Buy Your Materials
Once you’ve got your permit in hand, you’re ready to buy your materials. You can find helpful staff at your local building supply store who will help you make sure you have everything you need, including the right size lumber, concrete for footings, and other items. For a full list of items you may need and quantities of each, check out our calculators to put together your shopping list.
Step 5: Attach the Ledger Board
Once you gather your materials, it will be time to start the building process. Your first step is to attach a ledger board. This is a horizontal piece of lumber that attaches to an existing wall of your home to provide deck stability. The size you need will depend on the size of your deck. For example, you’ll need a 2’ x 12’ foot ledger for a 24’ x 14’ deck. Be sure the ledger board is attached properly, using bolts -- not screws. Your attachment should also meet code requirements for bolt-through details into a solid part of the house. Attaching a ledger board improperly can lead to a structural deck failure.
Step 6: Dig the Deck Footings
Use string to outline the raised deck footings. Four footings are common for a typical deck. Plan for a 12-inch width for each footing and 48 inches deep to get below frost lines. This is important for stability, but even more so in colder areas where you need to check how deep your soil will freeze during winter months. You can dig the footings by hand or rent a power auger to make the process easier.
Step 7: Set Your Posts
Once you’ve dug your footing holes, it’s time to position your posts in the holes and check that they’re plumb (exactly vertical). It’s worth double-checking them before you pour the concrete in case you need to reposition them.
Step 8: Mix and Pour the Concrete
Using bags of concrete you’d purchased when you were gathering your materials, you can premix the concrete using a small cement mixer (that you can rent) or mix the appropriate amount in a wheelbarrow. Pour it into the holes to hold the posts. Allow the concrete to set. This will take approximately 48 hours.
Step 9: Prepare and Brace Temporary Posts
Once the concrete has been cured, brace the posts for stability, adding beams or rim joists. Once your beams or rim joists have been placed, add joist hangers to the inner sections. Use a level to measure and trim the tops of the posts to ensure that they’re even to create an attractive, symmetrical look to your deck.
Step 10: Install the Permanent Joists
Joist hangers will strengthen the load-bearing weight of your deck. There are different sizes for different size lumber. You can use them to join the joists to the ledger. Reinforce with wood blocks cut from the same size wood material as the joists (called blocking) between the joists to prevent the joists from twisting.
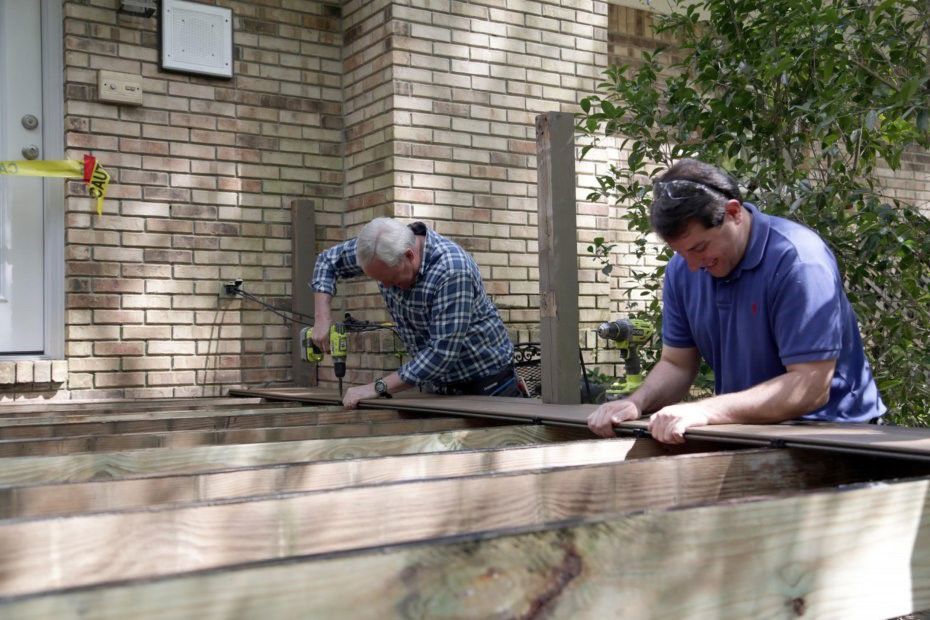
Step 11: Install the Decking
Now that you’ve laid your foundation (literally), here’s where your above-ground deck really begins to come together and resemble the deck of you’ve dreamed of. Gather your decking boards and start laying them (temporarily) in the middle of the deck. Lay the first row perpendicular to the joists at the ledger beam (or along the side of the house) and install them with deck screws. If this is your first DIY project, you might not be attempting an ambitious patterned inlay. However, staggering the adjacent rows of decking is a simple way for even DIY beginners to achieve the most aesthetically pleasing pattern for their deck, resulting in a polished look.
Step 12: Prepare Your Elevated Deck Stairs
You can buy a stair package for your raised deck at most home supply stores, or you can build your own deck stairs following tutorials. No matter which option you choose, you’ll need to pour a concrete pad for the base of the stairs. This pad is typically 4 inches thick.
Step 13: Stair Footings
Based on your deck’s size, make one footing for a post to support the upper stair landing and four footings to support the stairs themselves. You can choose a stair design that goes straight to the ground or that turns at 90 degrees, depending on what works best for your own backyard and home structure.
Step 14: Install Post Anchors
Attach the post anchors to the deck footings using a hammer drill designed for heavy-duty work. Installing these anchors will keep the stairs steady and safe.
Step 15: Framing & Attachment
With most of the parts in place, it’s time to start connecting each of them to one another. Plumb your posts, keeping them straight and then install the landing framing. Once your posts are straight and your landing framing has been installed, attach your decking to the joists.
Step 16: Build the Stair Runs
A stair run or tread is the part of a stair that you step on. A stringer is the wide board that supports the stair treads on either side and runs at an angle. The calculations are important for the stairs and stringers for them to be within code regulations.
Step 17: Install Stair Railings
In order to be compliant with building codes and safety regulations, stairs need guardrails with handrails. The minimum deck railing height is 34 inches. You may choose to bolt the post to the stair riser or stringer at the top and bottom, then confirm they are even before you repeat the process with the next posts.
Step 18: Install Deck Railings
Measure your railing post locations and railing height, making sure they conform to building codes and your blueprints that had been approved. Depending on your deck size, posts may be 4 - 8 feet apart with rail height of 36-42 inches. If you’re planning to cap your posts, be sure to allow extra room for the caps. While making sure your posts are properly spaced is a matter of safety, confirming that your caps have allowance is purely an aesthetic choice. You’ve already put in a lot of hard work on your deck, so it’s important to be sure it looks its best to give you a return on your investment!

Additional Considerations for Building an Above Ground Deck
Building an elevated deck can take time, but it’s a rewarding process. Before you break ground and start laying the foundation for a deck you’ll enjoy for years to come, weigh the various factors involved in building your deck and how it can impact your options. The terrain, the deck’s location, budget, materials and project completion timeframe all factor into raised deck planning.
- Terrain: Is the ground sloping or particularly rocky? A home or ground that tilts at an incline can impact the post’s depth while the second can impact the difficulty of digging for the deck posts. Be sure to take this into consideration to ensure a smooth process and a safe deck.
- Location: Depending on where your deck is in relation to your home, any trees on your property, or within your backyard, it may receive a lot of sun exposure. If your deck is likely to get a lot of sun during the hours of prime use, you may want to build or add a roof to your deck for extra shade.
- Materials: Today, you have a variety of options of materials to choose from when building an elevated deck. These include natural wood (like cedar), pressure-treated lumber, and composite decking materials-- which offer the look of wood blended with other materials, resulting in decking that requires less maintenance than traditional wood decking. Do your homework on which is the best option for you. Your choice will depend on your tastes, budget, and how much maintenance you want to perform on your deck each year.
- Timing: Allow adequate time to build your elevated deck. This is an advanced home project. Even if you’re a seasoned DIY-er, taking your time or working with a partner to build your deck properly will take a few weekends. You’ll also want to allow for weather that can impact your timeline -- like snow or excessive rains.
These step-by-step directions on how to build a raised deck will help you build the deck of your dreams. Click to explore images of raised and elevated decks.