Deck stairs are often the most complicated part of building a deck, but they don’t have to be intimidating. If you plan to tackle the project yourself, this guide breaks the process into clear, manageable steps. You’ll learn how to plan, measure, and build stairs that are safe, sturdy, and code-compliant. And if you’re not sure whether to take on a project like this, this article will help you understand what’s involved, so you can decide with confidence whether to build it yourself or call in a pro.
Anatomy of Deck Stairs
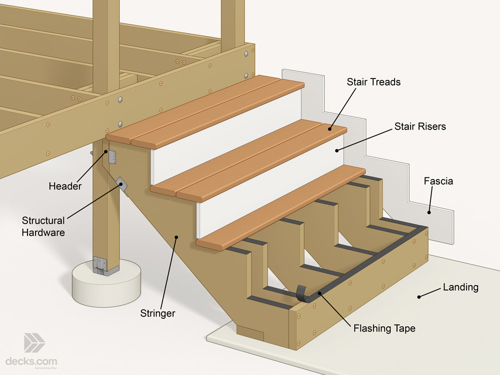
Understanding the basic parts of deck stairs will make the building process much easier. Each component plays an important role in how the stairs look and perform. Here’s a quick overview of the key parts you’ll be working with:
- Fascia: A trim board that covers the outer face of the stair stringers for a clean, finished appearance.
- Flashing Tape: A waterproof barrier applied to the tops of framing members to prevent moisture damage and rot.
- Header: The framing member that connects the tops of the stair stringers to the deck framing, securing the stairs in place and adding extra support for their weight.
- Landing: A stable and level surface at the bottom of the stairs that provides a stable transition from the stairs to the ground or walkway.
- Risers / Rise: The vertical boards between each tread that close off the space and give the stairs a finished look. The rise refers to the vertical height of each step.
- Stringer: The structural backbone of the stairs, cut from 2x12 lumber, that supports the treads and risers.
- Treads / Run: The horizontal boards you step on, usually made from the same material as the deck surface. The run refers to the horizontal depth of each step.
Be Aware of Code Requirements
Well-built deck stairs should not only look good, they must also be safe. That’s why local building codes specify clear standards for stair design. Taking time to plan your stairs according to code can prevent costly corrections later, and more importantly, prevent accidents.
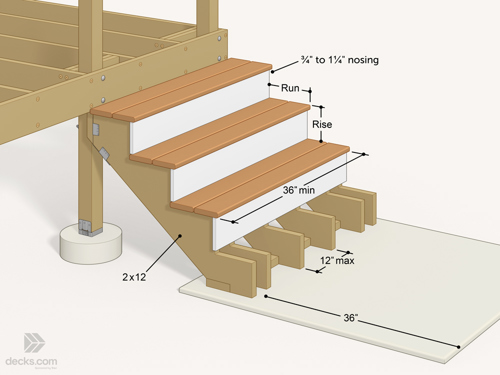
- Stair Rise: Each step’s vertical height, or rise, must be between 4 inches and 7-3/4 inches. The difference between the tallest and shortest riser should be no more than 3/8 inch to avoid creating a tripping hazard.
- Stair Run (Tread Depth): The horizontal depth of each step should be at least 10 inches, measured from tread nosing to nosing. If the tread depth is less than 11 inches, building code requires a nosing that projects between 3/4 inch and 1-1/4 inches beyond the riser below.
- Stringer Size: Stair stringers must be made from 2x12 lumber or an engineered material of equivalent strength.
- Stringer Spacing: The maximum spacing between stringers can be as wide as 24 inches when using 2x lumber for treads, but most composite decking manufacturers require spacing no greater than 12 inches on center to prevent flexing and ensure proper support. Some scalloped composite deck boards could require spacing as close as 9 inches.
- Total Stair Width: Stairs must be at least 36 inches wide, measured between the inside surface of the railing or handrails if handrails are installed.
- Stair Support: Deck joists are typically sized to support the deck surface, not the added weight of stairs. Longer stair systems often require additional support posts with a header or beam installed between them to carry the load of the stringers and ensure the stairs remain stable over time.
- Landings: Most building codes require a flat, solid landing at the base of the stairs, typically at least 36 by 36 inches. The landing should be made from stable, durable and weather-resistant materials like concrete, pavers or ground-contact-approved materials like some treated wood and composite decking.
By following these code requirements, you’ll create stairs that are safe, comfortable, and ready to pass inspection the first time. Because building codes can vary by location, always check with your local building department before starting, to ensure your stair design meets all regional requirements.
What Is the Best Way to Build a Landing for Deck Stairs?
A small concrete slab makes a durable and relatively simple landing for deck stairs, but you can also build one using ground-contact-rated wood or composite decking. If your bottom step meets an existing surface, such as a patio or walkway, and the riser measurements don’t divide evenly, consider building the landing at a slightly different height to balance out the steps. It’s usually best to build the landing before constructing the stairs, since it’s much harder to level soil, pour concrete, or install pavers with the stairs already in place. Just be sure to get your stair math exactly right first, so you know the correct height and distance to position the landing.
What is the Best Size for Rise and Run on Deck Stairs?
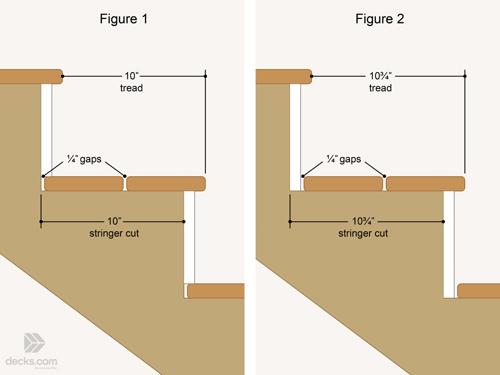
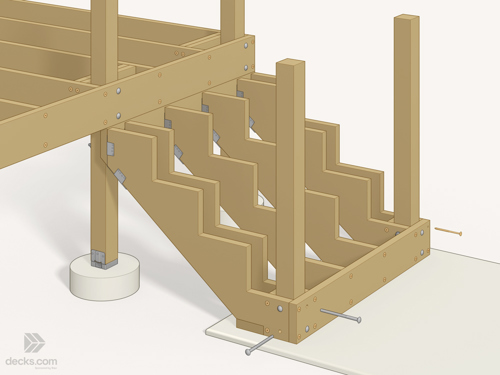
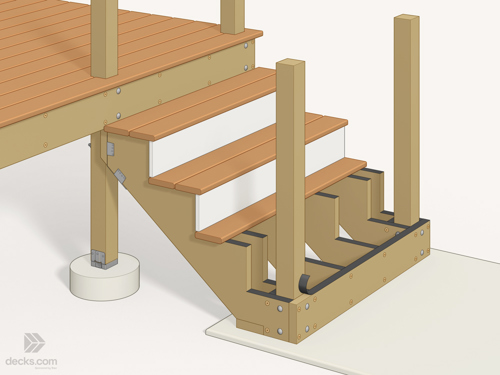
Most deck builders use two full-width deck boards (5-1/2 in. wide) to create the treads (run), so they don’t have to rip boards down or hide cut ends. If you use 3/4-inch riser boards, you can achieve a tread that is between 10 and 10-3/4 inches, which gives you some flexibility as to how far out the stairs extend from the deck. If you want a 10-inch. tread (measured from nosing to nosing) you install the riser board so it sits on top of the tread boards (Figure 1). If you want a 10-3/4-inch step, you can install the riser boards behind the tread boards (Figure 2). If you need a wider step, you will end up using more than two deck boards or some other type of material.
Draw Up a Plan Before You Build
Before you start cutting, take time to plan your stair layout. Consider where people naturally enter and exit the deck, and choose a location that feels convenient and safe. Installing a longer stair run along the side of the deck is a smart way to keep the stairs from extending too far into the yard. Stair dimensions must be precise—uneven rises or runs can create tripping hazards—so double-check all measurements before you make any cuts. To simplify the measuring process, use this handy Stair Calculator to determine the correct rise and run for your project.
How to Build Deck Stairs Step by Step
Now that you’ve planned your layout and double-checked your measurements, it’s time to start building. The steps below will help you stay organized and ensure your stairs come together safely and accurately. Every builder has their own methods, tools, and preferred hardware, so your approach may vary, but this guide walks you through one proven way to get the job done right.
Step 1: Figure Out the Number of Treads/Runs and Height of each Rise
Before cutting your stringers, it’s critical to calculate both the number of treads (the horizontal depth of each step) and the height of each rise (the vertical distance between steps). Getting this math right ensures your stairs feel comfortable and meet code.
Start by determining the number of treads.
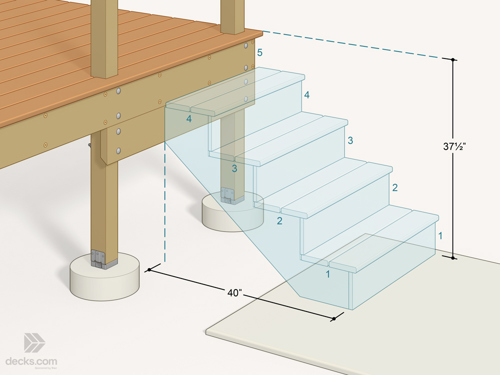
Measure horizontally from the edge of the deck to the point where the bottom of the stairs will rest on the landing. Then divide that distance by your intended tread depth, typically around 10 inches for deck stairs. For example, if the horizontal distance between the deck and the landing is 40 inches, the math looks like this:
40 in. ÷ 10 in. = 4 treads.
If the result includes a fraction, always round up. For instance, if the distance between the deck and the landing is 45 in. The math would look like this: 45 in. ÷ 10 in. = 4.5, which means you’ll need 5 treads, extending the stairs another 10 inches outward from the deck.
Next, calculate the riser height. Measure vertically from the top surface of the landing to the top of the deck boards. Then divide that number by the total number of risers, which is one more than the number of treads. In this example, a total rise of 37.5 inches with 5 risers results in:
37.5 in. ÷ 5 risers = 7.5 in. per rise.
This falls within the IRC code requirement of 4 inches minimum and 7-3/4 inches maximum.
If your landing height is fixed, such as an existing patio or concrete slab, you may need to adjust your stair layout to stay within code. For instance, if the total height is 40 inches, dividing by 5 risers results in 8 inches per rise, which is too steep. Adding another tread and riser changes the math to:
41 in. ÷ 6 risers = 6.83 in. per rise,
which is comfortable, safe, and code compliant.
If you have flexibility in the landing height, you can tweak that dimension slightly to achieve your ideal riser height.

Step 2: Mark the First Stringer
Before laying out your cuts, sight down each 2x12 and mark the crown, the slight upward bow along the board’s length. Position all the crown so they face up when the stringer is installed. This prevents the stairs from sagging over time and helps keep the treads level.
Lay a framing square on your 2x12 so one leg marks the rise and the other the run. Hold the square firmly and draw along both edges to mark the first step. Then slide the square down so the rise mark lines up with your last run line and draw the next step. Repeat until all treads and risers are marked.
To speed things up, clamp stair gauges to the square at your rise and run measurements—this locks in the layout so each step is identical. When you’re done, double-check that the total rise matches your deck-to-landing height before cutting.
Step 3: Adjust the Bottom Riser
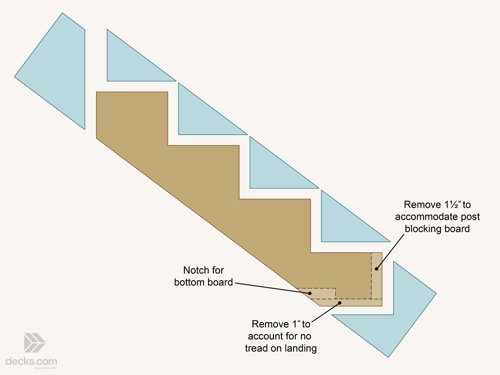
Before you cut the steps into the stringer, you need to adjust the bottom step in three ways:
- Trim the stringer bottom by 1 inch (or the thickness of your deck boards). The top of the deck framing along with each tread will be topped with deck boards, but the landing won’t, so trimming compensates for that difference and keeps every step the same height.
- Shorten the first tread by 1-1/2 inches. The bottom of the stairs often ties into posts or blocking, so you’ll need space for a 2x board that will be installed along the face of the first rise.
- Notch the bottom edge to fit a 2x4 or 2x6 that will run beneath all the stringers. This board anchors the stairs securely to the landing.
Step 4: Cut the First Stringer
Once your layout is marked and adjusted, carefully cut along the lines. Use a circular saw for most of each cut, stopping just short of the corners, then finish the corners with a jigsaw, handsaw or reciprocating saw. Always stay on the same side of your layout lines to keep dimensions consistent and tight.
Step 5: Mark and Cut the Remaining Stringers
Use the first stringer as a template for the rest. Trace its layout directly onto each new board to ensure all stringers match perfectly. Mark the original stringer clearly so you can identify and reuse it for every trace. Minor imperfections can occur each time you copy a pattern, which is fine, but if you trace from one new board to the next, those small errors can add up. Using the same master stringer each time keeps your cuts consistent.
Step 6: Protect the Stringer Cuts
Pressure-treated lumber is infused with preservative chemicals, but the treatment doesn’t always penetrate fully to the core. When you cut, notch or drill the boards, you expose untreated wood that can rot more quickly, especially outdoors where the wood contacts moisture and air. To help prevent decay, brush on a wood preservative to all freshly cut ends, notches and holes before assembly.
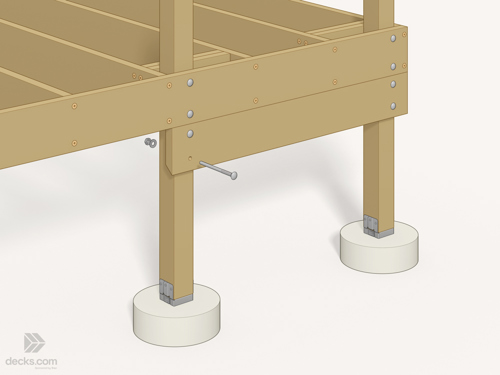
Step 7: Install the Header
Before attaching the stringers, install a header board. The header should be the same width as the stairs and made from a 2x10 or larger board, depending on your stair width and load. For most stair runs, you can cut the bottom edge of the header at a slight angle, so it sits flush against the slope of the stringers. Secure the header to the support posts using corrosion-resistant structural screws or bolts.
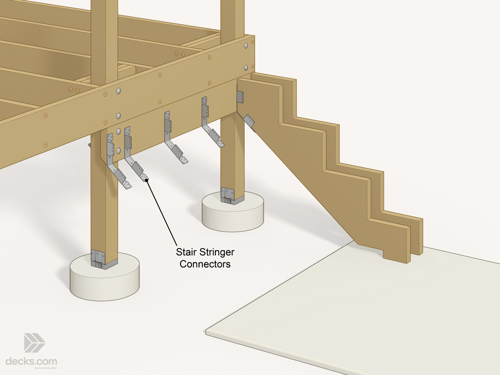
Step 8: Install the Stringers
Lay out and install structural stair stringer connectors on the header at the proper height, making sure each one lines up exactly where the stringer will rest. Use approved metal connectors, rated for outdoor use and pressure-treated lumber, along with the manufacturer’s recommended fasteners.
Set each stringer into its connector so it fits tight against the header and sits solidly on the landing. Double-check that all stringers are installed at the same height and angle, ensuring each stair step will be flat and consistent.
Step 9: Fasten Joists to the Landing
Mark the location of each stringer along the bottom support board, then slide the board into place at the base of the stairs. Once positioned, fasten the stringers by angling treated-wood-approved screws through the stringers into the support board, or use approved structural connectors rated for outdoor use and treated lumber.
After the stringers are secured, check that the entire stair assembly is perpendicular to the deck and not racked out of square. To verify, measure diagonally from corner to corner—the measurements should match. You can also check for square by placing a framing square to check the connection where each side stringer connects to the rim joist. Once everything is square, use appropriate structural fasteners to anchor the bottom board securely to the landing.
Note: For short stair runs with only a few steps, you can install the bottom board first and then set all the stringers in place at the same time. Learn more about how to anchor stairs to concrete.
Step 10: Add Posts and Blocking
With the stringers secured, install the railing support posts and any necessary blocking to stiffen the stair assembly. Everything should feel rigid before moving on to the finish work. Learn more about installing stair posts and railing.
Step 11: Install Flashing, Treads, Risers and Fascia
Apply self-adhering flashing tape on top of the joists and blocking. This adds an extra barrier that helps prevent water infiltration and rot. Once protected, follow the manufacturer’s instructions and use approve fasteners to install the tread, riser, and fascia boards. When finished, your stairs should be solid, level, and ready for the railing.
Tools and Materials Needed to Build Deck Stairs
Before you begin, gather all the tools and materials you’ll need. Having everything on hand will make the job go more smoothly and help you avoid unnecessary trips to the hardware store. Below are the essential tools and materials for building sturdy, code-compliant deck stairs.
Tools Required
- Drill & bits (wood and masonry)
- Driver & bits
- Circular saw
- Jig saw, reciprocating saw or handsaw
- Wrenches or ratchets (for through bolts or masonry anchors)
- Tape measure
- Pencil / marker
- Hammer
- Utility knife
- 2-ft. and 4-ft. levels
- Clamps
- Framing square
- Speed square
- Paint brush
- Gloves
- Safety glasses
- Hearing protection
Materials Required
- 2x12 for stringers
- 2x board for header
- 2x4 or 2x6 for bottom support board
- 2x8 for railing post blocking
- Wood preservative
- Self-adhering joist flashing tape
- Stringer hanger brackets
- Hanger bracket nails or screws
- Structure bolts or screws for header
- Structure bolts or screws for blocking
- Masonry bolts or screws (for concrete landing)
- Screws for tread boards
- Screws for riser boards and fascia
- Brackets and fasteners or screws to secure bottom board
- Deck boards for treads
- Fascia for risers and sides of stringers
Additional Resources: